Loading...
Loading...
Loading...
Loading...
Loading...
Loading...
Loading...
Loading...
Loading...
Loading...
Loading...
Loading...
Loading...
Loading...
Loading...
Loading...
Loading...
We're redesigning our product stack to make it available for different programming languages and improve the overall developer experience.
We don't add new features to current products, only fixing urgent issues. We try to keep you up to date on anything that might break, but may have missed something. If you encounter any issues, please .
The Web-Wallet, our custodian wallet white-label solution, with which you can enable users to receive, share and store Verifiable Credentials, manage DIDs and their related keys and view tokens from different blockchain ecosystems. All in one place.
Web-Wallet
White label web-wallet solution, enabling your users to manage VCs, DIDs, Keys and view their NFTs.
Issuer Portal
Issue VCs to users via same or cross device flow using OIDC4VC & OIDC4VP standards
Verifier Portal
Verify VCs of users, to grand them access to a service and much more.
Depending on your preference, start exploring with the deep dive or jump directly to the setup.
Quick Start
Launch your wallet - Start the app in your local environment and receive the first VC.
Visit our deployed version - start issuing and verifying your own credentials.
Full Guide
Customize your wallet - Detailed presentation of the wallet app and its dependencies.
Deep dive
Architecture - The wallets components and which walt.id libs are used under the hood.
Functions - An overview of all the functionality offered by the wallet.
Configurations - Adjust settings to fit your needs.
Credential configurations set up the environment for functions related to authorization, credential, DID and key management. Currently, the following configurations are available:
specifies the remote location which web-wallet backend should use to proxy all the credential management, key management, DID management and authentication requests to. The configuration is stored in the wallet.conf file.
e.g. wallet configuration
A push notifications service can be configured so that the end-user will receive notifications for both when they receive a credential accept request or a verification request. The configuration is stored in the push.conf file.
e.g. push notifications configuration
Run our products with the support of our experts.
All our products are open source under the permissive Apache 2 license. This means:
You can use, modify and distribute our products for free and without strings attached.
You can use our products to build pilots or even production systems.
You can deploy, run and manage our products on-premise or in your own cloud environments.
To complement our free products, we offer services for clients who want to manage our products by themselves:
Consulting
Custom development and integration
Support / SLAs
if you want to learn more.
Let us run our products for you.
We offer our products as a managed cloud service for clients who do not want to deploy, manage and run our products by themselves.
The Cloud Platform includes:
All products
Enterprise use cases
Fully managed cluster
Cloud SLA / support
if you want to learn more.
Users can login with two options
Web3 Accounts
Ethereum - Learn more about Sign in with Ethereum .
Tezos - Learn more about Sign in with Tezos here.
Near - Learn more about Sign in with Near here.
Polkadot - Learn more about Sign in with Polkadot here.
Flow - Learn more about Sign in with Flow here.
Algorand - Learn more about Sign in with Algorand here.
remoteWallet = "https://wallet.walt.id"pushPrivateKey="{server-private-key}"
pushPublicKey="{server-public-key}"
pushSubject="mailto:[email protected]"Web-wallet backend is configured with a set of files describing the configuration using the Hocon format (Human-Optimized Config Object Notation). Things that can be configured relate to:
issuer-portal - the IssuerUrl environment variable should be set, specifying the location where the issuer-portal can be reached at. By default, it is set to http://localhost:8080. For local development, this can be updated in the wallet-frontend .env file:
Several options are available when it comes to using the web-wallet, depending on specific use-case:
source code - when a higher level of customization is desired
docker images - when a packaged solution is good enough
cd waltid-web-wallet/web &&
echo 'IssuerUrl="http://localhost:8080' > .envwallet-frontend
docker pull waltid/wallet-backend:latestdocker pull waltid/wallet-frontend:latestStorage configuration describes which database should be used for data persistence and the connection string required to connect to the database. This information is organized in 2 separate configuration files:
db.conf - database configuration
db.<database>.conf - datasource configuration
Database configuration holds the datasource configuration filename (with no extension). The content of this configuration file will then be loaded and used as the connection string for the database. The filename should have the following format: db.<database> The database configuration is stored in the config/db.conf.
They hold the connection string used to connect to the chosen database.
Can be found in config/db.sqlite.conf
Can be found in config/db.postgres.conf
Token-related configurations hold token auxiliary data mapping. Currently, there are 2 configurations available:
Chain explorer configuration holds the mapping of chains to their respective explorer location. It is stored in the chainexplorer.conf file.
e.g. chain explorer configuration
Marketplace configuration holds the mapping of chains to their respective marketplace location. It is stored in the marketplace.conf file.
e.g. marketplace configuration
In order to be able to fetch NFT data for owner addresses, the NFTKit dependency should also be configured for the desired chains.
Refer to for details about NFTKit configurations. The walt.yaml configuration file should be mounted under the project's root folder: waltid-web-wallet/walt.yaml.
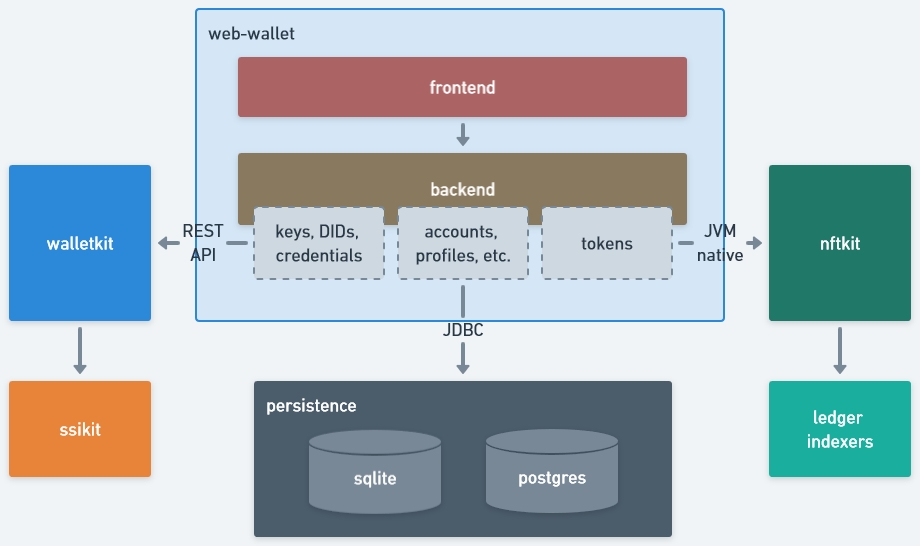
Web-wallet consists of 2 modules (both part of the same repository):
frontend - customer facing user interface that enables user interaction with wallet's main functions
backend - providing the required support for frontend, such as:
authentication (walletkit)
credential-related dependencies (walletkit)
token-related dependencies (nftkit)
storage (RDBMS)
Considering the context, web-wallet offers the following functions:
- functions related to verifiable credentials
- functions related to crypto collectibles
- display and manage cryptographic keys
database = "db.sqlite"database = "db.postgres"hikariDataSource {
jdbcUrl = "jdbc:sqlite:data.db"
driverClassName = "org.sqlite.JDBC"
username = ""
password = ""
transactionIsolation = "TRANSACTION_SERIALIZABLE"
maximumPoolSize = 5
autoCommit = false
dataSource {
journalMode = "WAL"
fullColumnNames = false
}
}hikariDataSource {
jdbcUrl = "jdbc:postgresql://127.0.0.1:5432/postgres"
driverClassName = "org.postgresql.Driver"
username = "postgres"
password = "postgres"
transactionIsolation = "TRANSACTION_SERIALIZABLE"
maximumPoolSize = 5
minimumIdle: 0
autoCommit = false
dataSource {
journalMode = WAL
fullColumnNames = false
}
}DID functions - display and manage DID methods
For more details about the available functions, check out the feature list which offers the option to explore all features in an overview list.
view - display verifiable credentials
JSON format
QR-code
delete - delete a credential from wallet
receive - accept / reject credentials
synchronously - with a request string, either:
scanned from a QR code
or input explicitly
present - scan a credential presentation request
addresses - display and manage crypto wallets addresses
tokens - display (and manage) crypto collectibles (NFTs)
import (JWK or PEM) - import any key (private or public) to wallet
create - generate a key (private or public)
view - display key information, such as algorithm, key-id or crypto-provider
delete - delete a key from wallet
export (JWK or PEM) - export a wallet key (private or public) using a given format
view - display the DID document of a DID url
JSON format
QR-code
create - create a new DID using the available DID methods
All our products are open source under the permissive Apache 2 license. This means:
You can use, modify and distribute our products for free and without strings attached.
You can use our products to build pilots or even production systems.
You can deploy, run and manage our products on-premise or in your own cloud environments.
if you are using our products. We are curious to learn about your experience and happy to spread the word about your project via our newsletter or case studies.
explorers = [
    {chain = "ethereum", url = "https://etherscan.io/address/%s"},
    {chain = "polygon", url = "https://polygonscan.com/address/%s"},
    {chain = "mumbai", url = "https://mumbai.polygonscan.com/address/%s"},
    {chain = "tezos", url = "https://tzkt.io/%s/operations"},
    {chain = "ghostnet", url = "https://ghostnet.tzkt.io/%s/operations"},
]marketplaces = [
{chain = "ethereum", name = "OpenSea", url = "https://opensea.io/assets/ethereum/%s/%s"},
{chain = "polygon", name = "OpenSea", url = "https://opensea.io/assets/matic/%s/%s"},
{chain = "tezos", name = "Rarible", url = "https://rarible.com/token/tezos/%s/%s"},
{chain = "flow", name = "FlowVerse", url = "https://nft.flowverse.co/marketplace/%s/%s"},
{chain = "unique", name = "Unique", url = "https://unqnft.io/market/%s/%s"},
]asynchronously - by means of the push-notifications service
A docker-compose configuration is provided as a convenience for quick-start. It sets up and starts all modules required to fully benefit from the wallet's functions. The runtime configuration files should be available in the same folder as the docker-compose file. There are sample configuration files provided, except walt.yaml which should be updated with the corresponding API keys.
If the web-wallet fails to render, make sure the hosts file contains the correct hostname. Check the troubleshooting for more details.
Change working directory
cd docker-composeStart services
docker-compose upThe following modules were enabled, to make use of all the functionality offered by the web-wallet.
Wallet-Kit - exposes an API used by the wallet to enable the management of VCs, DIDs and their related keys.
NFT-Kit - used as a native dependency to enable the display of NFTs in the wallet.
Issuer Portal - the web page with which the wallet interacts to receive credentials.
Verifier Portal - the web page with which the wallet interacts to do credential verification.
Find configuration options available for your wallet below. The docker-compose used a default setup for quick start.
web.conf - host configuration
storage configuration:
db.conf - database configuration
db.<database>.conf -
wallet.conf - to enable credential, key and DID functions ()
walt.yaml - to enable token display functions ()
Refer to the Configurations section for more details.
When the wallet user starts an issuance flow from the wallet by clicking "request credential", the web-wallet needs to know the location where it should redirect the user to. This location is configured on the wallet-frontend side with the IssuerUrl environment variable.
Wallet Kit needs to be configured for the following modules:
backend - refer to
issuer portal - refer to
verifier portal - refer to
git clone https://github.com/walt-id/waltid-identity.gitgradle v7.5.1 - to build the wallet-backend
Node v.16+ - for wallet-frontend
pnpm v.8.1.0+ package manager - to run the wallet-frontend
Clone waltid-identity
Change into web-wallet backend folder
wallet-frontend source folder
wallet-backend
wallet-frontend
Refer to Runtime configurations from the Quick Start section.
The modules referenced in the Requirements section from Quick Start need to be available before starting the web-wallet, so that all functions are enabled. Otherwise, the web-wallet will offer only account management functions (sign in / sign up, profile and settings).
The default storage option is sqlite. If postgres is used as the storage option, the database should be available before starting the web-wallet.
start wallet-backend:
extract the build output (either .tar or .zip)
copy the configs from waltid-web-wallet/config to ./waltid-web-wallet-0.0.1/bin/config
execute
start wallet-frontend
Wallet-backend is available at: http://localhost:4545 (the port number configured in web.conf).
Wallet-frontend is available at: http://localhost:3000.
cd build/distributions &&
tar xf waltid-web-wallet-0.0.1.targit clone https://github.com/walt-id/waltid-identity.gitcd waltid-web-walletcd waltid-web-wallet/webgradle clean buildpnpm installcd web &&
pnpm dev./waltid-web-wallet-0.0.1/bin/waltid-web-wallet